
Editing/Adding Goals
To create a goal, follow these simple steps in Atrilyx:
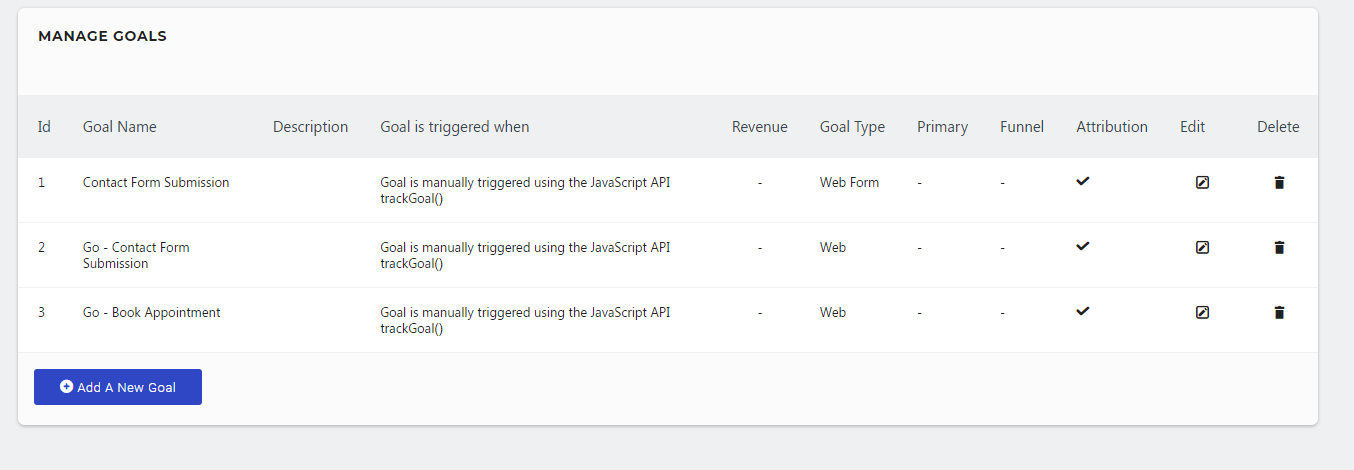
Go to the settings section and click on "Manage Goals."
On the Manage Goals page, you will find your existing goals listed. To add a new goal, simply click on the big "Add A New Goal" button.
By clicking the button, you will be taken to the Update Goal view. Here, you can enter all the necessary details for your new goal.
If you are unable to access this feature, please ensure that you have the appropriate Write permissions.
When selecting a goal name, it's important to choose something descriptive and easy to remember. For instance, you could use "New Job Application" as a clear example. If you anticipate having multiple similar goals, it's helpful to establish a naming convention. For instance, you might use a pattern like "Click - Affiliate Link" and "Click - Partner Site." This way, you can quickly identify and refer to similar goals. In the given example, you can immediately recognize that both goals involve link clicks on your site, with additional details on what exactly was clicked. Additionally, you have the option to include a brief description below the name field to aid in remembering specific details or the context of the goal.
Goal Triggers
There are two ways to set up goal triggers: automatic built-in triggers and manual triggers. Let's explore each method:
Automatic Triggers (Recommended): When you enable the "When Visitors" option, you can easily select from a range of pre-defined triggers without the need for any extra code. Here are some examples of automatic triggers you can choose from:
Visit a specific URL (page or group of pages)
Visit a page with a specific title
Send an event
Download a file
Click on an external website link
Stay on a page for a specific duration of time
Simply select the relevant trigger from the options provided.
Manual Triggers: Alternatively, you have the option to manually trigger goals by adding custom JavaScript to your website. This allows you to define specific conditions that, when met, will activate the goal.
Remember, automatic triggers are the easiest and recommended method for goal setup, but if you require more advanced customization, you can opt for manual triggers with custom JavaScript.

Trigger Definitions
For each of the methods mentioned above, you'll need to specify the action required to activate the trigger for your goal. Let's take "Visit a given URL (page or group of pages)" as an example. Here are the available options and their explanations:
Contains: This option triggers the goal when a visitor visits a page with a URL that contains the text you enter in the text box. It's useful when you want to match multiple pages with a similar theme. For instance, entering "contact" would activate the goal for pages like "https://example.com/contact.html" or "https://example.com/support/contact/."
Is Exactly: This method allows you to be very specific. The goal will only fire when a visitor lands on the exact URL you enter. For example, entering "https://example.com/contact/submitted/" would activate the goal specifically for that page, which may be shown after someone submits a contact form.
Matches The Expression: This is the most advanced and complex method. It utilizes regular expressions (regex) for precise targeting. If you're unfamiliar with regex, it's important to learn and test your patterns thoroughly before using them. An example pattern, such as (.)/contact/(.), would match any page containing "/contact/" in the URL, like "https://example.com/contact/".
In all matching types described above, there is an option to enable case sensitivity. When enabled, a trigger set to check for an exact page title match, such as "Contact Us," would not trigger for a page titled "CONTACT US" due to the use of uppercase letters.
Remember to choose the appropriate matching type and consider case sensitivity based on your requirements.

Primary Goal
Primary goals represent only the central objective(s) you aim to accomplish with your digital marketing campaigns. To edit which of your goals are by default flagged as primary, simple check off the checkbox.
Goal Configuration Options
Allow Multiple Goal Conversions: In this step, you can choose whether to allow multiple conversions per visit or not. By default, each goal is counted only once per visit. This is useful for situations like newsletter subscription confirmation pages, where users can only register once but may load the confirmation page multiple times. If you want to track cumulative results for specific actions (e.g., multiple product reviews or job applications), you can update the setting to allow the goal to be converted more than once per visit.
Tracking Goal Revenue (optional): While not every goal leads directly to revenue, many do, either directly or indirectly. In the standard goal creation flow, you have the option to set an optional goal revenue figure. This value doesn't have to be precise or tied to a sale, but it can help you evaluate the effectiveness of your marketing efforts. For example, if you know that on average, one out of every hundred leads results in a $1,000 sale, you can estimate that each lead is worth approximately $10. Setting the goal revenue to $10 reflects the logic that reaching the hundredth lead will likely result in at least one $1,000 sale.
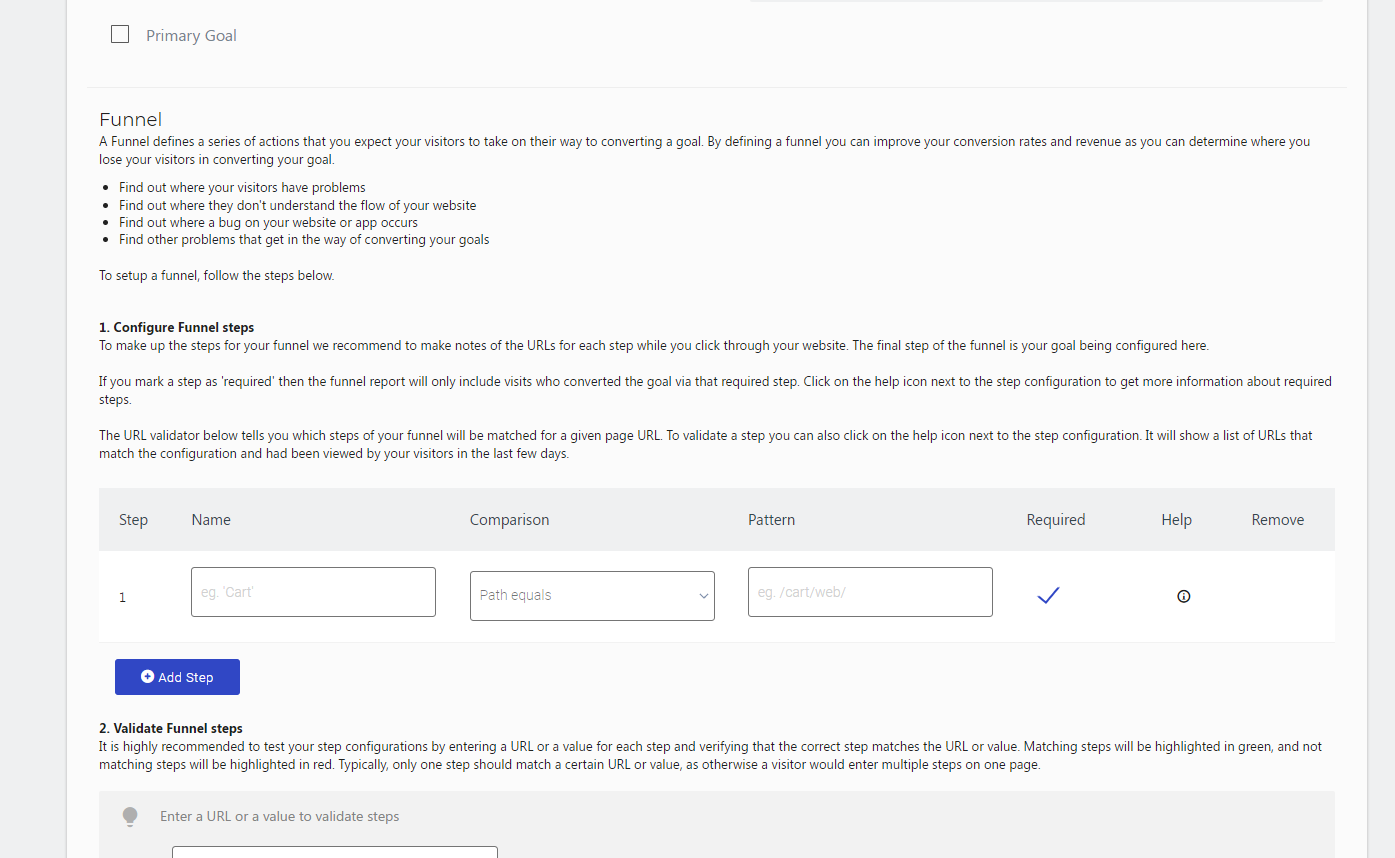
Funnel Settings
In the next step, you can configure funnel tracking, which helps you understand users' conversion paths leading up to completing a goal. It's valuable for identifying where users who don't convert the goal are encountering difficulties, allowing you to improve those steps and enhance goal conversions.
For example, let's consider an online college application process:
College Information Page: This is the beginning of the funnel where users can view general information about the college and its programs.
Program Selection: The next step is selecting a specific program or course of interest.
Online Application Submission: The final goal of this funnel is reaching the online application submission form.
While your goal metrics track the total number of people who have submitted an application, it's also important to know the percentage of people who reached each stage of the conversion funnel. Using the online college application example, you might discover that many visitors reach the College Information Page and Program Selection stage, but for some reason, they don't proceed to the application submission page. This could indicate potential issues with the program details or the final conversion step, prompting you to investigate and make improvements accordingly.